If your bathroom mirror appears foggy after every shower, then it means that your bathroom exhaust fans with light isn't doing its job. If you are relying on natural aeration to clear the moisture build up in it, then it is the high time you installed a vent in it. Installing a fan in your bathroom will of course eliminate those steamy windows and mirrors, but one most important reason to install it is to prevent all or most of moisture-related issues like mold growth and mildew. It also clears up stale odors by making your bathroom "breathe" all through. So generally, a bathroom fan is a gadget every bathroom should have if hygiene is at all your priority.

The process of bathroom exhaust fan installation isn't as difficult as it is perceived. However, if done by someone who isn't experienced or doesn't follow the guidelines properly, then it will simply be another disaster on top of your existing bathroom problems. By and large, bathroom exhaust fan installation is not a rocket science thing. That's why I have compiled an exclusive steps to doing it. Following them will make your installation as smooth as possible, fun and super easy! Read on to know how.
1. Remove the old fan
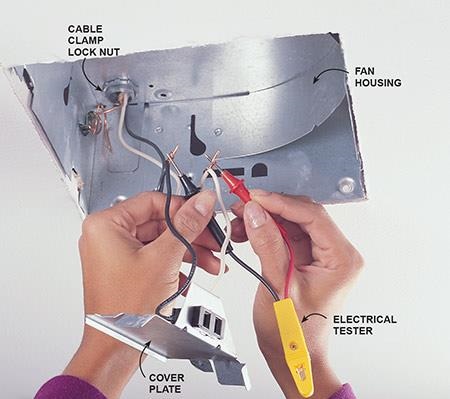
Of course, if your bathroom had a fan before you will start by removing it. Simply cover your working area with a cloth to collect dirt falling from the spot. Switch off the power and test to ensure that it is actually off. Unscrew the cover, disconnect the motor and remove the whole housing. Disconnect the wires and remove them. If no there wasn't previous installations, then cut a hole at a convenient place, preferably over the toilet. Do not place it above the shower or tub. After marking the edges, drill a hole so that the saw can fit in during the initial cutting. Use the fan housing as a template to ensure that the cutting is the right size.
2. Mount the fan and cover the insulation
Attach the fan housing to the joints with mounting screws. Leave a 6" gap between the housing and the insulation.
3. Installing the vent and pipes
Note: if you are mounting a side vent then you can skip this step.
- Make a hole in the roof.
It should be large enough to fit the vent and tailpipe.
- Installing roof vent
It can be installed by sliding the top flange below the shingles and right above it. Seal the openings by applying roofing cement on the underside of the flanges.
4. Connect the duct
In this step, slide the clamps over the flexible duct at both the roof cap and the fan. Similarly, slip the clamps over the tailpiece of the vent and tighten the clamps.
5. Do the wiring
So far so good. If the previous wiring is working properly then, connect the fan with the cable running from the switch. If it is the first time to install, then make a switch and run cables from it to the fan. These instructions are usually available on the cover from the manufacturer. Mount the fan motor into the build-in receptacle.
6. Wire the switch you had made
Use wire connectors and wiring tape to seal naked wires. Connect the red wire to one terminal of the switch and the black to the other terminal of the switch. Use the third wire for grounding.
I hope you enjoyed reading this guide as I enjoyed writing it. Follow it carefully and precisely and you will be on your way to saying goodbye to steamy windows and mirrors and not forgetting the much disturbing stale odors.


