Ceiling fans can add a certain amount of beauty to a room, while providing a comfortable experience for the occupants as well. Even though they seem fairly easy to set up, ceiling fans with lights equire a number of mandatory procedures to ensure a solid installation. From the wiring to the attachment of the final pieces, a ceiling fan needs a steady hand as well as a fair bit of electrical knowledge to complete the entire process. Here are the essential ceiling fans installation process steps.

Ceiling Work
· The very first step is to cut a hole in the ceiling that will house the new electrical box. If there is an existing hole, replace the old electrical box with the new one ensuring all the wiring is set up properly. Mark the wires with electrical tape so that connecting them becomes easier.
· Once the electrical box has been wired, use a ceiling medallion to hide the hole. The medallion can be glued on or screwed on (depending on the material it is made of). If the fan comes with a mount that is large enough to hide the hole, a medallion doesn’t need to be placed.
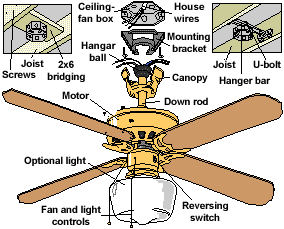
· Install the ceiling mount properly, ensuring that all the wiring is threaded through for a thorough connection. Always double check that the mount is sturdy enough and is installed properly, because it is the base on which the fan hangs.
Assembly
· Putting together all the components of the fan can be quite easy, so long as the manual is followed diligently. Even skipping out on a single step could result in a faulty ceiling fan. When dealing with screws and bolts, make sure that the ones provided by the company are the ones used as they are perfectly designed to fit in the grooves created.
· Regular ceiling fans usually come with five major components; the blades, the motor, the canopy, the downrod, and the ceiling mount. The motor should be connected to the downrod and locked in place with the help of a screw and a wrench. Thread the wires through the pipe and place the canopy over the electrical box on the motor.
· Lift the fan and attach it to the ceiling mount which is already in place. It is important not lock the fan in place until the connections have been made correctly. This will make it easier to correct any mistakes made during the process.
Wiring
· Before making any connections, make sure that the main line, or even the switch is turned off. Using the previously marked wires, make the right connections and seal them using electrical tape to keep them dry and strong.
· Once all the connections are made, turn the switch on to ensure it works. If it doesn’t, make the corrections.
· Use the other canopy to cover the wires and lock it in place with a screw.
Blades
· Attach the blades to the motor using the screws provided. Tighten them using a screwdriver or wrench until they do not turn any further.
Ceiling Fans Installation is usually left to the professionals, but as seen in the above steps, it can be completed successfully by anyone in a matter of minutes. All it takes is concentration and determination, as well as someone who can follow instructions well.


