Ceiling fans come in all shapes and sizes with some having as few as 2 blades, to those that come with 9 blades. These machines have been around for a long time and have been giving their users the kind of comfort that can release any amount of stress and discomfort. But, when not maintained properly, ceiling fans with lights can often stop providing the liberating breeze it once did, or even worse, stop functioning completely. So, in order to ensure that ceiling fans parts are in perfect working condition, here is a breakdown of those parts and how to maintain ceiling fan parts in the right way.
Mounting Device
Before anything else, the mount on which the fan hangs needs to be installed. These mounts come in various materials, sizes, and shapes. The most common one are metal (usually steel and iron) because these act as the base of the fan and hold all the weight of it. In many parts of the world, a common “S” hook is used to suspend the fan by latching it on with a sturdy pin. A plastic casing covers the metal hook and protects it from moisture and rust.
How to maintain: Regular dusting with a cloth or broom. A damp cloth will also help keep the fan looking new.
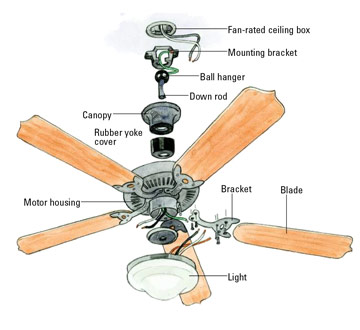
Downrod
For rooms that have a high ceiling, downrods are usually the go-to part for any fan. These rods are made from metal as well and come in various lengths. According to the height of the room, the downrod is placed so that the fan is just low enough to help in optimum circulation, and is just high enough to avoid any tall person’s hands. The downrod connects the mount to the motor of the fan.
How to maintain: Light cleaning with a dry or slightly damp cloth. Avoid using a wet cloth because it could lead to rusting and short circuiting.
Motor
This is the heart of any ceiling fan. A powerful motor is key when it comes to picking out a perfect fan. It can either be connected to the mount directly, or to the downrod as mentioned above. The motor is the most essential part of the fan and is encased in covers made from either plastic, metal, or even wood. This ensures that no splashes of water, dust, or insects can get to it.
How to maintain: Dusting the outer casing with a cloth or broom. Stay away from washing with soap and water as it might damage the mechanical parts inside.
Blades
Probably the second more important component of a ceiling fan, the blades are the reason behind the cool breeze that flows throughout the room. Like most of the fan, the blades too can be made from various materials such as metal, wood, and plastic. It is essential, though, to accurately measure the room and calculate the square feet of the surroundings so that the blade span properly fits into the room and does not create a hindrance to the room and the people in it.
How to maintain: Depending on the material used. Plastic blades can be washed and dried. Wood blades should be wiped and varnished if worn out. Metal blades should be wiped with a dry cloth to avoid rusting. A coat of paint can be applied to the blades if worn out.
Blade Irons
What might seem like a rather simplistic machine, a ceiling fan can include a number of small (sometimes tiny), yet very important
parts. The blade irons are one of the most important. They are used to attach the blades to the motor. These metal arms or flanges as they are called, need to be sturdy and capable of holding the weight of the blade while the fan rotates at high speeds. Proper fastening of the blade irons ensures that the people under the fan are safe from them coming loose and falling.
How to maintain: Light dusting regularly to keep cobwebs away, or wiping with a damp cloth when excess oil discharges accumulate.
Flywheel
Usually made from metal, these components are attached to the shaft of the motor. The blade irons can also be attached directly to the flywheel. Sometimes, they are made of tough, hardened rubber which reduces the overall weight of the fan itself. A lock-screw helps lock the flywheel to the motor shaft while bolts are used to attach the flanges to the motor.
How to maintain: With constant usage, the flywheel can often wear away or break which results in spoiling the fan. To replace it, the connection needs to cut and the switch housing needs to be removed which gives access to the lock-screw on the shaft connection.
Ball and Socket Mount
Using either a plastic or metal hemisphere that is mounted on the downrod, this mount is placed in a metal bracket that is attached to the ceiling. It allows the ceiling fan to move freely and provide sufficient air circulation to all parts of the room. This type of mount is commonly seen on vaulted ceiling rooms. While this type of mount is quite outdated, fan manufacturers are now coming up with modern ways to use it in their products.
How to maintain: Cleaning the ball and socket mechanism takes a lot of effort as the entire fan needs to be uninstalled. Usually, the component is cleaned while changing houses or replacing the fan and can be done with a damp cloth.
J-Hook Socket Mount
It is one of the best and easiest ways to attach a ceiling fan. The J-Hook or Claw hook is installed into the ceiling and the fan is fastened onto the metal hook. To keep the fan from moving all over the place and vibrating when in motion, a sturdy rubber grommet is placed between where the downrod is attached to the hook.
How to maintain: Cleaning the J-Hook mount is extremely easy and requires a quick dusting from time to time. Because it is made of metal, using water to clean it could result in it rusting over time.
Low Ceiling Adapter
For those rooms that have a very low ceiling and cannot use downrod’s to attach the fan, specialized low ceiling adapters can be obtained from the manufacturer itself. They allow users to install fans in rooms with very limited ceiling clearance safely. They can be made of metal or very hard plastic as they need to carry the weight of the fan entirely.
How to maintain: If the adapter is made of metal, it is advised to use a dry cloth or duster to avoid any rusting. The plastic adapters can be cleaned with a damp cloth.
Motor Housing
This is an optional piece for a ceiling fan that can be used to add a more aesthetic quality to your home. Usually made of plastic and sometimes of very light metal, the motor housing is used to encase the motor of the fan. In some cases, the housing can help keep dirt and dust away from the vital components of the fan.
How to maintain: Cleaning the motor housing can be done in two ways. Either dusting or wiping the casing while it is still attached to the fan, or removing the entire piece and washing (in the case of plastic). Ensure that the housing is completely dry before reattaching it as it could cause damage to the electrical wiring of the fan when wet.
Switch Housing
Similar to a motor housing, the switch housing or switch cup is a cylinder made of metal and is installed below the motor and usually in the center. It helps hide the many wires, switches, and capacitors that can be found on a fan. Some ceiling fans are fitted with an oil reservoir that ensures that the bearings are always lubricated and working correctly. The switch housing effectively conceals this and adds beauty to the room as well. It is also an ideal place to install a light kit.
How to maintain: Because it is made of metal, cleaning the switch housing should be done with a dry cloth. In case water needs to be used to get rid of oil stains, ensure that it is completely dry before attaching it again. The moisture could also cause a short circuit as it is exposed to wires and switches.
Blade Badges
Many ceiling fans come with boring, single colored blades that don’t add any beauty to the room or to the home in any way. Blade badges are the perfect addition to any mundane fan. They are used to conceal the screws and bolts that are used to attach the blade irons to the blade or the blade directly to the motor. They can be metal or plastic and come in various designs, sizes, and colors to match the fan itself.
How to maintain: Keeping these pieces clean doesn’t take a great deal of time or effort. They can be wiped with a damp cloth or dusted regularly. If any of the badges lose their color or break off, they can easily be replaced with new ones.
Assorted Switches
Many ceiling fans come with individual ceiling fan parts that can be used to operate it. These include switches for turning it on and off, regulators for adjusting the speed of the fan, regulators to change the direction of the rotation, and switches to operate the light attachments. Nowadays, ceiling fans come with infrared switches as well that work with the use of a remote control.
How to maintain: While the switches themselves are made of plastic usually, it is important to remember not to use water when cleaning these components as they are directly attached to wires and could cause serious damage to the fixtures.
Light Attachments
Today’s fans come with lighting solutions as well and are categorized into three types.
· Uplights – These lights are installed on the top of the motor housing and are used to create ambiance in a room as it disperses light onto the ceiling.
· Downlights – Commonly seen on modern ceiling fans around the world, these components spread light around the room and are installed under the motor housing.
· Inbuilt Lights – The newest designs come with decorative bulbs mounted inside the motor housing. There are glass or plastic panels under the motor to allow light to pass through to the room.
How to maintain: Keeping this component dry at all times ensures a long lifespan and therefore it is advised to gently dust the light with a dry cloth rather than a wet one.
Ceiling fans don’t need constant care and maintenance and are long lasting machines that provide great comfort to everyone in the room and around it. That is why it is important to properly maintain these above mentioned ceiling fans parts so that they can deliver their best for a long time.


