Ever since they were introduced, outdoor ceiling fans with light have given us a level of comfort no hand fan could provide. These ingenious machines have allowed us to relax and cool down when the temperature outside is just unbearable and have offered us a fresh take on pretty much everything. A ceiling fan basically consists of a motor and at least 2 blades that attach to the motor and produce the breeze. But choosing the perfect fan size can be a difficult thing because there are a number of factors to consider. Here are a few steps in choosing the right one from the various sizes of ceiling fans (42 inch, 52 inch, 60 inch, 44 inch, 72 inch, 70 inch, 36 inch, 48 inch, 30 inch), and where to use those sizes.
1. Calculating Room Space
Before you make an impulse purchase of a ceiling fan you like, ensure that it fits in your home and the room your wish to place it in. Measure the square feet of the room and the ceiling as well. Take into consideration any pillars or crossbeams that could hinder the performance of the fan. Here are some tips to measure a fan and figure out whether it will fit in the room.
- With odd number of blades, measure from the center of the motor to the tip of one blade and multiply it by two. That will give you the total blade span of the fan.
- With even number of blades, simply measure from the tip of one blade to the tip of the blade opposite it.
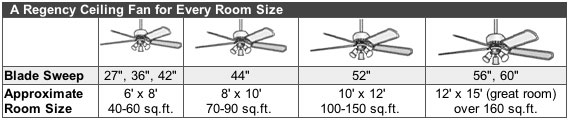
Here are some recommended fan sizes for the appropriate room sizes in square feet:
-
30 inch, 36 inch ceiling fans for a < 75 square foot room.
-
42 inch, 44 inch ceiling fans for a 76 – 144 square foot room.
-
48 inch, 52 inch, 54 inch ceiling fans for a 144 – 225 square foot room.
-
60 inch, 70 inch, 72 inch ceiling fans for a 225 – 400 square foot room.
2. Decide The Hanging Distance
This is a crucial step in installing a new ceiling fan. Too high and the breeze will not reach the people. Too low and anyone tall enough could be in danger when stretching or raising their hands.
When it comes to low ceilings (8 feet), the fan should be fixed using a “Flush Mount” that is literally stuck flush to the ceiling. There should be a minimum distance of 7 feet from the blades to the floor and a minimum space of 18 inches from the blade tip to the wall.
For higher ceilings such as 9 feet and above, using a ceiling mount and a downrod is essential for optimum circulation. If the ceiling has a slope in it, a special slope ceiling mount should be used along with a downrod to properly install the fan.
3. Choosing The Correct Downrod Length
.jpg)
As mentioned above, a downrod is used when ceilings are higher. Here are some examples of the perfect length of the downrod.
- For 8 feet ceilings a 3 inch downrod or flush mount.
- For 9 feet ceilings a 3 or 6 inch downrod.
- For 10 feet ceilings a 12 inch downrod.
- For 11 feet ceilings an 18 inch downrod.
- For 12 feet ceilings a 24 inch downrod.
- For 13 feet ceilings a 36 inch downrod.
Using these three simple steps, installation of a ceiling fan becomes easier and more efficient. As you can see, choosing the size and height of the fan directly depends of the size and height of the room it is about to be placed in. Choose wisely and take accurate measurements to ensure the best and most comfortable air circulation.


